
















 ● 20 min read
Showdown: RS550 12V DC 8000 vs RS-555 12V DC 6000 RPM DC Motor
Vol. 56 | The Heavyweight DC Drivetrain Duel Reliability isn’t optional when you’re designing actuators that need to move actual steel or
Read Article →
| Bulk Pricing | ||
|---|---|---|
| QTY | Unit Price(Inlc. GST) | |
| 10+ | ₹489.02 ₹ 414.42 + 74.6 GST | |
| 20+ | ₹484.03 ₹ 410.19 + 73.83 GST | |
| 30+ | ₹479.04 ₹ 405.97 + 73.07 GST | |
| 50+ | ₹469.06 ₹ 397.51 + 71.55 GST | |
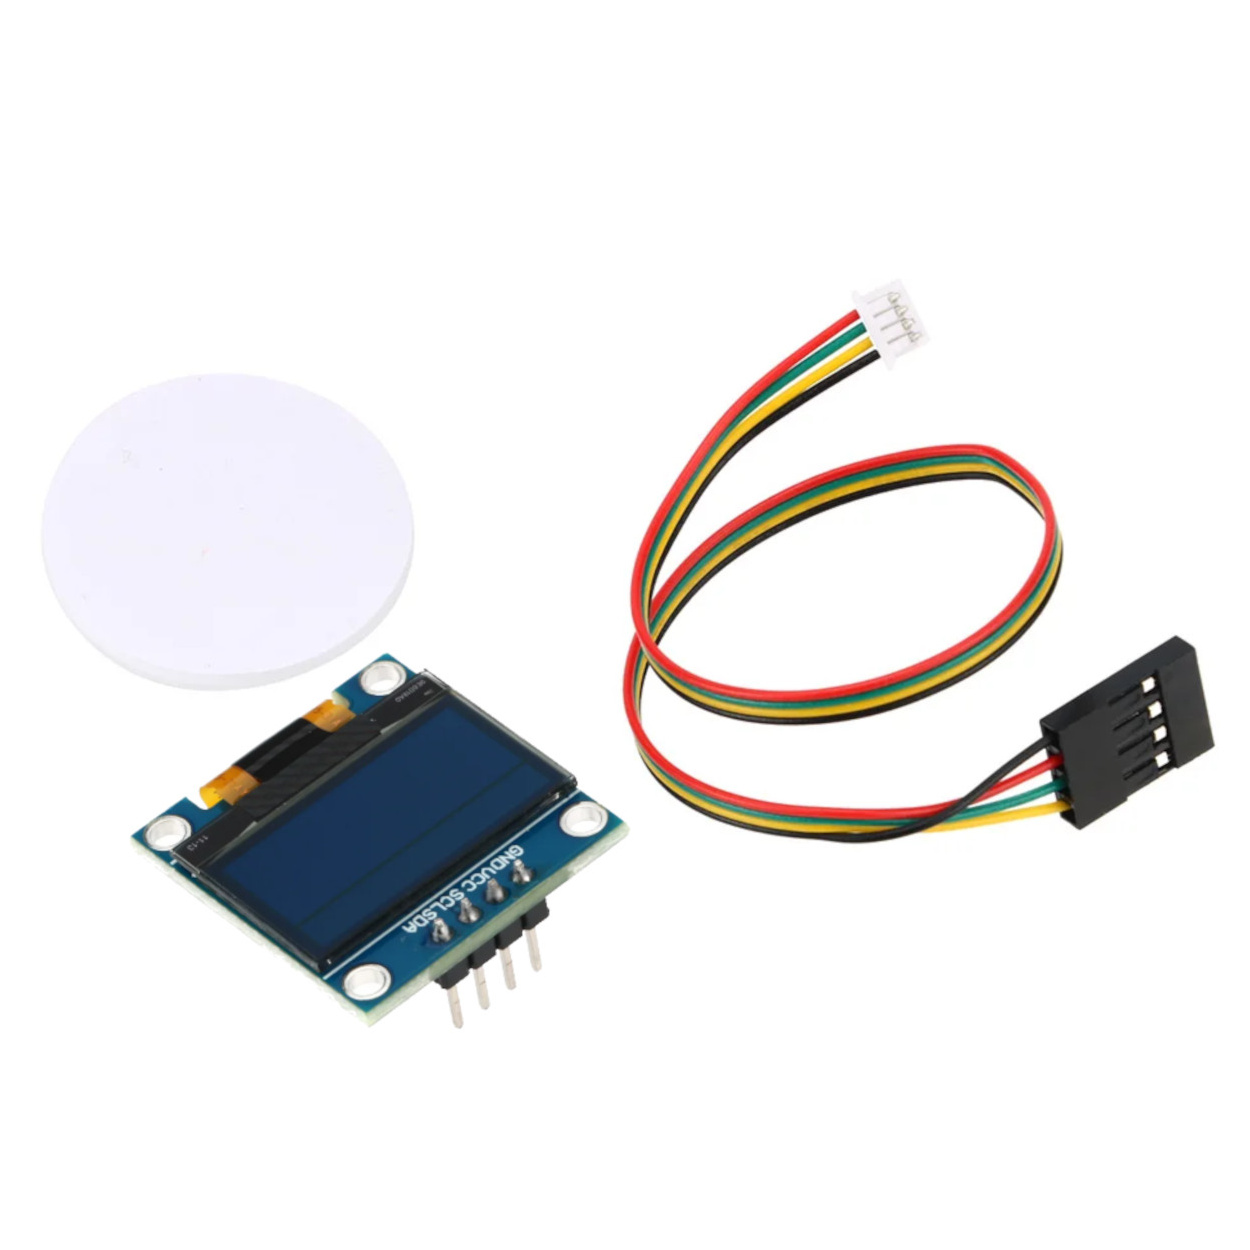
View your drone's vital stats without a laptop! This high-contrast OLED display plugs directly into the I2C port of your Pixhawk 2.4.8 or PX4 flight controller. It displays real-time flight modes, GPS lock status, battery voltage, and pre-arm warnings.
Instant On-Board Diagnostics When you power up your drone in the field, waiting for the main LED to turn solid green can be a game of patience. Is it waiting for more GPS satellites? Did the compass calibration fail? Is the battery too low to arm? This OLED module eliminates the guesswork. By reading data directly from the flight controller's internal bus, it translates complex system codes into highly legible, plain-text messages right on the screen. You can instantly see your current flight mode (e.g., STABILIZE, LOITER, AUTO), the exact number of locked GPS satellites, and any pre-arm failure warnings.
Seamless I2C Integration This module is designed for absolute plug-and-play simplicity. It utilizes the universal I2C (Inter-Integrated Circuit) communication protocol. You simply plug the included 4-wire cable (GND, VCC, SCL, SDA) into the designated I2C port on your Pixhawk 2.4.8 or PX4 flight controller. Because I2C is an addressable bus, you can even use an I2C splitter board to run this screen simultaneously alongside your external GPS compass and airspeed sensors without any data collisions.
High-Contrast OLED Technology Unlike older LCD screens that wash out in sunlight and require heavy, power-hungry backlights, this module utilizes Organic Light-Emitting Diode (OLED) technology. Every individual pixel emits its own light, resulting in incredibly high contrast ratios and wide viewing angles. This makes the crisp, bright text easily readable outdoors on the flight line, while the entire module remains exceptionally lightweight and draws almost negligible power from your flight controller.
Specifications
Compatibility: Pixhawk 2.4.8, PX4, APM (Requires firmware version 3.5 or above)
Communication Interface: I2C (Inter-Integrated Circuit)
Display Technology: Monochrome OLED
Resolution: 128 x 64 pixels (Standard)
Pinout: GND, VCC (5V/3.3V), SCL, SDA
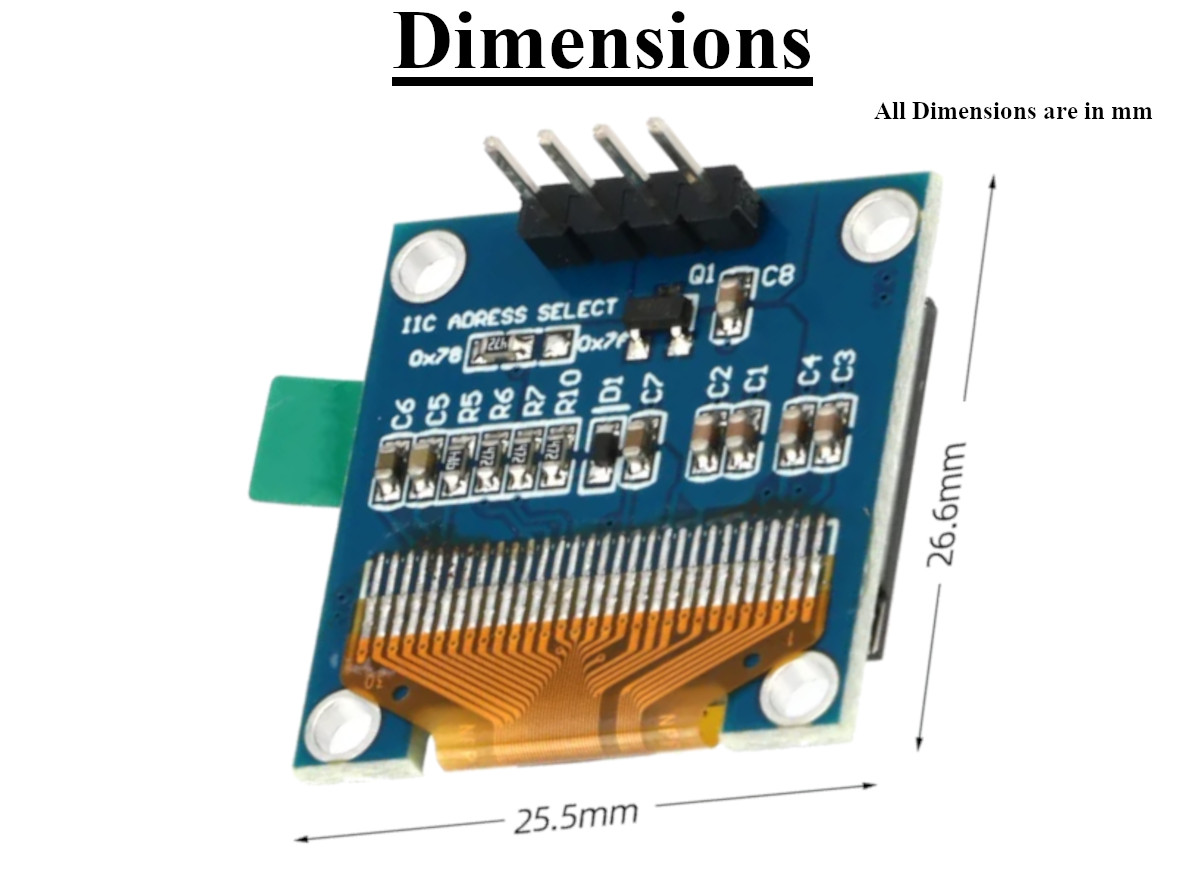
PCB Dimensions: 26.6mm (Height) x 25.5mm (Width)
I2C Address Selection: Configurable via SMD resistor pads (Default usually 0x3C or 0x78)
Mounting: 4x M2 or M3 corner mounting holes
Key Applications and Projects
Commercial Drone Fleets: Providing operators with a mandatory, secondary visual confirmation of satellite lock and battery voltage before launching heavy payloads.
Autonomous Rovers: Mounting the screen on the dashboard of an ArduRover vehicle to monitor waypoint progression without needing a constant telemetry radio link.
DIY Flight Controller Tuning: Quickly verifying that flight mode switches on your RC transmitter are correctly mapped in the software before taking off.
Unlock New Capabilities (Project Evolution) The Custom Dashboard Drone: Don't just stick the raw circuit board to the top of your frame! Evolve your build's aesthetics and durability. Use a CAD program and a 3D printer to design a sleek, angled dashboard pod that houses this OLED screen and an external RGB LED module. Mount the pod securely to your top carbon fiber plate. This not only protects the delicate ribbon cable on the back of the screen from branch strikes but gives your DIY drone the polished, professional look of a high-end commercial aircraft, while providing critical data at a glance.
1 x OLED Display Module (Pre-soldered with 4-pin header)
1 x 4-Wire Connection Cable (Compatible with standard Pixhawk I2C ports)
1 x Circular Double-Sided Adhesive Mounting Pad
1 x Basic Firmware Instruction Sheet
1. What exactly does this screen display? Once configured, it displays real-time telemetry from your flight controller. This typically includes the current Flight Mode (Stabilize, RTL, Auto), ARM/DISARM status, GPS status (number of satellites and HDOP), Battery Voltage, and any pre-arm error messages.
2. Which flight controllers are compatible? It is primarily designed for the Pixhawk 2.4.8, older APM boards, and other PX4-based flight controllers running ArduPilot or PX4 firmware.
3. Does it work right out of the box? Hardware-wise, yes. However, you must enable the display in your flight controller's software. In Mission Planner (ArduPilot), you must go to the Full Parameter List and set the NTF_DISPLAY_TYPE parameter to 1 (or the specific value for your firmware version) to turn the I2C screen on.
4. What version of firmware do I need? As noted on the included instruction sheet, your flight controller must be running firmware version 3.5 or above to natively support this OLED display output.
5. How do I wire it to the Pixhawk? You use the included 4-wire cable. Plug the white connector into the I2C port on the Pixhawk, and the black DuPont connector onto the screen's pins, ensuring that GND goes to GND, VCC to VCC, SCL to SCL, and SDA to SDA.
6. My Pixhawk's I2C port is already used by my GPS compass. What do I do? You need to purchase an inexpensive "I2C Splitter Board." This allows you to plug multiple I2C devices (like your compass and this screen) into the single I2C port on the Pixhawk simultaneously.
7. Is the screen readable in bright sunlight? OLED technology provides excellent contrast, making it significantly more readable outdoors than standard LCDs, though direct, harsh overhead sunlight can still cause glare on the glass.
8. Can I change what information is displayed on the screen? In standard ArduPilot/PX4 firmware, the layout and information displayed are hardcoded and cannot be easily customized without modifying and compiling the source code yourself.
9. What are the dimensions of the circuit board? The main blue circuit board measures 26.6mm in height and 25.5mm in width.
10. What are the solder pads labeled "IIC ADRESS SELECT" on the back for? I2C devices need unique hardware addresses. The screen typically defaults to 0x78 (or 0x3C in 7-bit addressing). If you have another device on your drone with the exact same address causing a conflict, you can move the tiny zero-ohm resistor on these pads to change the screen's address to 0x7A.
11. Is the screen waterproof? No. The OLED glass, the delicate ribbon cable, and the exposed circuitry are highly susceptible to water damage. It must be protected if flown in wet conditions.
12. Why is there a delicate orange ribbon cable on the back? That ribbon cable connects the actual glass OLED panel to the blue driver circuit board. You must handle the module carefully and avoid bending or tearing that ribbon cable, or the screen will be permanently destroyed.
13. Does this drain my drone's battery significantly? No. OLED screens are incredibly power-efficient because they do not use a backlight. It draws only a few milliamps from the 5V rail of the flight controller, which will not noticeably affect your flight time.
14. The screen is completely blank after I plugged it in. Why? First, double-check your wiring (GND to GND, VCC to VCC). If the wiring is correct, you likely haven't enabled the NTF_DISPLAY_TYPE parameter in Mission Planner and rebooted the flight controller.
15. The text on the screen is scrambled or glitching. How do I fix it? This is usually caused by a poor electrical connection or too much noise on the I2C bus. Ensure your cables are seated tightly and try to route the I2C cable away from your main power wires and ESCs to reduce electromagnetic interference.
16. Can I use this screen with a Raspberry Pi or Arduino? Yes. While it is marketed for Pixhawk, the screen itself is a standard SSD1306 (or similar) I2C OLED display. You can wire it to an Arduino and use standard Adafruit OLED libraries to display your own custom text and graphics.
17. How should I mount the screen to my drone? The kit includes a white double-sided adhesive pad for sticking the back of the PCB to a flat surface. For a more robust solution, use the four corner holes to screw it to a 3D-printed mount.
18. What do SCL and SDA stand for? They are the communication lines for the I2C protocol. SCL stands for Serial Clock, and SDA stands for Serial Data.
19. Does the display show data during flight? Yes, it updates continuously. However, because it is mounted on the drone, it is primarily useful for pre-flight checks on the ground and post-flight status reviews, as you cannot read it while the drone is high in the air.
20. Will this work with Betaflight or iNav? Betaflight and iNav do support I2C OLED displays, but the setup process and the data displayed will be completely different than the plug-and-play experience designed for ArduPilot/PX4. You will need to configure the display settings via the Betaflight CLI.
Probots sells every Electronics Part for your next Project. You can order 10,000+ Electronic Parts Online - Arduino, Raspberry Pi, NodeMCU Development Boards, Sensors, Motors, Motor Drivers, SMPS, Plastic Enclosures etc in India directly on probots.co.in
We delivery electronics components and parts throughout India using standard couriers like Bluedart, Delhivery & India Post.
For order related queries contact -
This item is covered by a warranty of 7 days from the date of delivery, against confirmed manufacturing defects only, as verified by Probots' own testing and investigation. In case of a confirmed defect, we will replace the item — a refund is issued only if a replacement can't be supplied (e.g. discontinued or out of stock). Transit damage or a wrong item received must be reported within 3 days of delivery.
If the product shows signs of misuse, tampering, physical damage, static discharge, liquid or fire damage, use of unapproved chemicals, or has been soldered or physically altered in any way.
China
Probots sells every Electronics Part for your next Project. You can order 10,000+ Electronic Parts Online - Arduino, Raspberry Pi, NodeMCU Development Boards, Sensors, Motors, Motor Drivers, SMPS, Plastic Enclosures etc in India directly on probots.co.in
We offer specialized services for Bulk, Wholesale & B2B Customers like discounted prices, additional shipping options, customised products, etc . Customer with large quantity & regular orders qualify for the specialised discounted rates.
We also offer dedicated sales team to assist you with the order process by providing sales quotations, PI, technical support for choosing products, etc.
Note: Business Orders are processed manually and usually take 1-3 days to process compared to placing the order directly on our website. Please plan your purchases accordingly.
Need Help?
For bulk enquiries contact us by -


Probots Electronics is highly regarded for its highly skilled team and knowledgeable staff who provide expert guidance to ensure customers select the right components for their technical projects. The business maintains a strong reputation for prompt service and reliable support, with many clients praising their quick response times and genuine commitment to customer satisfaction.


A very great place for electronics Such a well maintained shop... Felt good shopping here


Nice

For new developments kit available and they will support till working, and I suggest this place strongly


This place has all the electronic parts students will ever need, staff is friendly and the place is organised.


It was a really nice experience! I was happy to find such a wide range of robotics kits for kids, suitable for different age groups and learning levels.

Excellent experience




Good stuff

Buyed them. But no bargain. Helpful staff.


Available all children school project spears parts like electronics


It was good experience




Staff is very patient and helpful

One of the best place for electronics you will get everything you want! With the best and orginal quality

Very helpful staff and the best place to buy components for projects

Wonderful store with expert service and technically strong people.

Prompt delivery, excellent technical support


Large inventory of electronic components and parts. Well trained service personnel and technicians who can quickly identify and rectify product defect if any. They are a reliable and trustworthy online stores.

A very great place for electronics Such a well maintained shop... Felt good shopping here
Nice
For new developments kit available and they will support till working, and I suggest this place strongly
This place has all the electronic parts students will ever need, staff is friendly and the place is organised.
It was a really nice experience! I was happy to find such a wide range of robotics kits for kids, suitable for different age groups and learning levels.
Excellent experience
Good stuff
Buyed them. But no bargain. Helpful staff.
Available all children school project spears parts like electronics
It was good experience
Staff is very patient and helpful
One of the best place for electronics you will get everything you want! With the best and orginal quality
Very helpful staff and the best place to buy components for projects
Wonderful store with expert service and technically strong people.
Prompt delivery, excellent technical support
Large inventory of electronic components and parts. Well trained service personnel and technicians who can quickly identify and rectify product defect if any. They are a reliable and trustworthy online stores.
● 20 min readVol. 56 | The Heavyweight DC Drivetrain Duel Reliability isn’t optional when you’re designing actuators that need to move actual steel or
Read Article → ● 13 min read
Workbench Vol. 49 🚀 The Project Trifecta: 3 Builds to Start Today We don’t just stock parts; we curate ecosystems. This week’s arrivals are desi
Read Article → ● 18 min read
Vol. 59 | The Battle of the Bite-Sized Boards Picture a project that needs full Linux, networking, and GPIO—but has almost no room for a conventional
Read Article →